
Every agent chat starts with three things already decided: the model that runs it, the instructions added to its system prompt, and the tools it can reach, meaning skills, plugins and Model Context Protocol (MCP) servers. If none of that is set up ahead of time, each new chat starts from the same blank defaults, and the same preferences get typed again, the same plugins get turned on again, and tools nobody needs in that chat still take up room in its context.
The Unstoppable desktop app gives you three places to settle these choices before a chat starts. Each one works at a different scope:
- Settings › Instructions holds text that every new agent session starts with, and lets you narrow parts of it to a harness, a model or a project type.
- Agents, on the Agents tab of Customize, saves a base model, instructions and plugins under one name you can pick like a model.
- Statuses in Customize decide whether each installed skill, plugin, MCP server and collection joins every new chat, waits until you call it, or stays off.
This post explains how the three fit together and where each kind of preference belongs. Each part links to the feature post that covers it in more detail.
Instructions every session starts with
Some preferences hold for almost every chat with a coding agent: how commit messages should read, which test command to run, how answers should be formatted. Those belong in Settings › Instructions, in the Agents group of Settings. Tommy Irish built this page; Give every new agent session your instructions describes it as it shipped in version 1.5.0.
The page has two sections. Chats covers chat sessions in Cowork, Code and Orchestrator. Workflows covers agent steps in workflows: agent prompts and Codex workflow turns. (In 1.5.0 these were labeled Pipelines and App Advisor; the behavior is the same.) Each section has an Overall instructions field that applies to every session in it.
Under the overall text, Scoped instructions are "Added only when a session matches." Select Add to create one, then choose what it applies to:
- a Harness: Claude, Codex or Ollama;
- specific models, grouped by provider;
- in Chats only, a Project type: Cowork, Code or Orchestrator.
A scoped instruction applies when a session matches any one of its selections. With nothing selected, it applies to every session in the section.
Each scoped instruction also has a mode. Append adds its text after the overall instructions. Replace "Replaces the global instructions when this scope matches. The first matching Replace wins." In practice the order of the list is its priority: the app starts with the overall text, adds each matching Append in list order, and the first matching Replace throws away everything collected so far and stops. The arrows beside each card move it up or down, and the page warns you on a card that a Replace above it would hide.
The result is added to the agent's system prompt under the heading "User Overall Preferences" when the session is created. That timing matters, and it comes up again below.
These instructions follow you everywhere. Text that belongs to one project's code, such as how a particular repository runs its tests, fits better at the project level. The 1.5.0 post noted that there was no scope for a single project. Code projects with more than one repository now have their own Instructions page in Project settings, shared by every worktree in the project; Give agents standing instructions covers that page alongside the Settings one.
A saved setup for one kind of task
Other preferences only make sense together. A certain kind of task may always call for the same model, the same extra instructions and the same handful of plugins. Choosing all of that by hand each time is where an Agent helps: a named preset you pick in the model picker. Tommy Irish built Agents; Save a model, instructions and plugins as an agent covers the first version, from desktop 0.28.0.
Agents now live in Customize, on the Agents tab, where your own are listed under Your agents. An agent has:
- a Name, shown in model pickers;
- a model identifier (ID), labeled Model ID, which workflows use to find the agent and which can't be changed after the agent is created;
- a base model, which either follows the default model each chat starts with (set in Settings) or is a specific model you pick. That can be a Claude, Codex, Cursor, GitHub Copilot, OpenCode or Ollama model, but not another agent;
- Instructions, appended to the system prompt whenever the agent is used, up to 64 kibibytes (KiB);
- Plugins: skills, plugins, collections and MCP servers that are turned on for every chat using the agent, on top of the chat's own selections.
Choose Create agent to save it. The agent then appears in the model picker, and a workflow can name it by its model ID wherever it asks for a model. An agent whose base model isn't available on the computer can't run until you connect that provider or choose another model.
Agents can be shared. Agents you share are listed under Shared by me, and agents others share with you appear under Shared with you, where you can install them. Sharing and installing shared agents need a signed-in account. An agent can't be shared while it includes collections, local-only plugins, MCP servers or MCP sign-in preferences, so a shareable agent is one built from skills and plugins others can install too.
Choosing what each new chat loads
Instructions and agents decide what a chat is told. The third layer decides which tools it starts with. Sergii Iurevych built the statuses, skill updates and MCP server health checks in Customize; How I keep my agent skills and MCP servers in order is his account of version 1.14.0. Open Customize from the sidebar, or press Cmd+5 (Ctrl+5 on Windows).
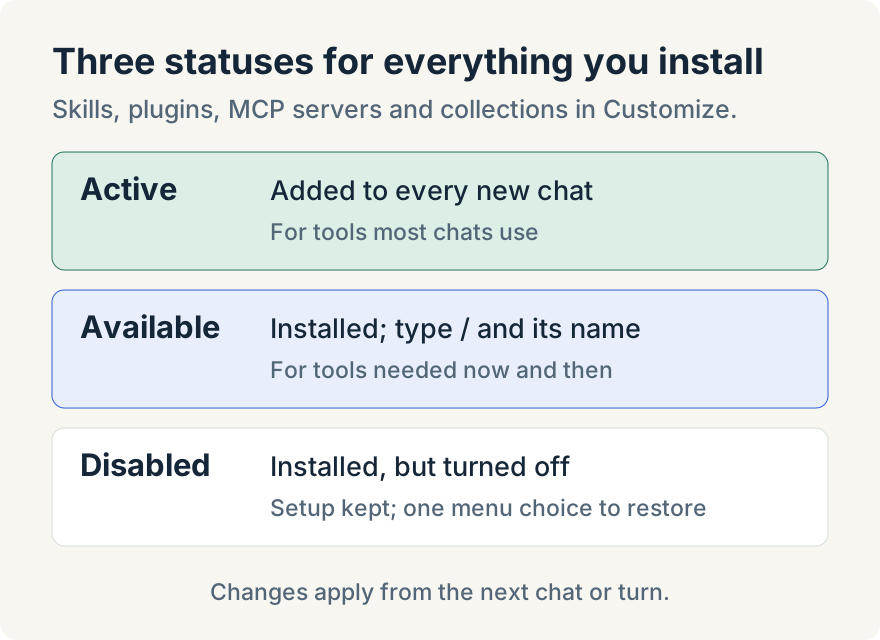
Every installed skill, plugin, MCP server and collection has one status, set from the menu on its row or on its page:
- Active: "Added to every new chat."
- Available: "Type / and the plugin name to use its skills." It stays installed but out of new chats until you call it.
- Disabled: "Installed, but turned off." Its setup is kept, so turning it back on is a menu choice rather than a reinstall.
Built-in workflows always show as Available, because they can't be turned off. Uninstall is in the More menu; uninstalling a collection removes the collection but keeps the skills in it.
Available is the status that keeps context small. A skill needed for one kind of job doesn't sit in every chat; it is one slash command away. An agent can also find an installed item that a chat lacks and turn it on mid-chat, as Let your agent load a skill or MCP server mid-chat describes.
Two limits apply. A change takes effect from the next chat or turn, and a tool already running in a chat may need a new chat to drop it. And Available can't keep everything out: a plugin enabled in Claude Code itself still loads in Claude chats, because Claude Code loads it, and Cursor and Copilot chats share that set. Only Disabled keeps such a plugin out of your chats.
Keeping installed items current and working
Two more parts of Customize keep the tools themselves in good order.
Skills installed from GitHub can change upstream. On a skill's page, Check for updates in the More menu looks for a newer version. When there is one, the page shows Update available with an Update button; when there isn't, it reads Up to date. The installed skills list has its own Check for updates for all of them. A skill removed from its repository shows "This skill is no longer in its source". This works only for skills installed from GitHub, there is no version number or changelog, and updates run in the desktop app.
MCP servers show a health badge in the list: Connected, Auth required, Unreachable or Not checked. The badge is the last recorded check, not live monitoring. A server's page has a Health section with the time it was last checked, a choice of configuration and Test connection. The result reads Connection succeeded or Connection failed, with the response time and the server's message, and lists the server's tools on success. When an agent reports that a tool call failed, this is the place to tell a server that is down from one that needs you to sign in again.
How the layers combine in a new chat
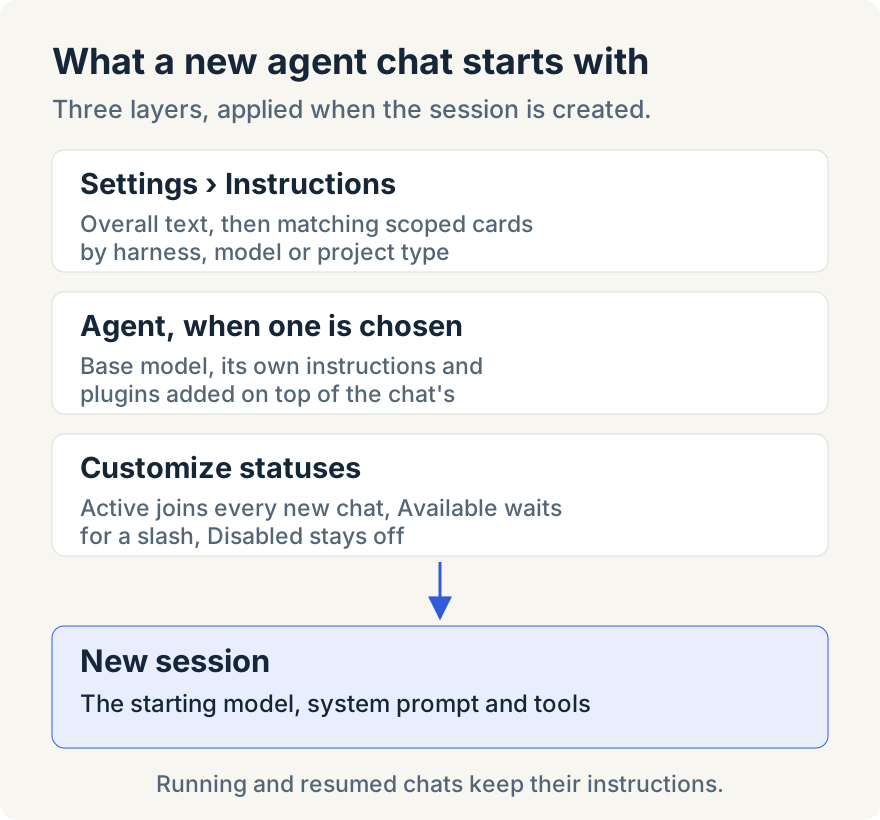
When a new session is created, the three layers meet:
- The model runs: the chat's chosen model, or, when the chat uses an agent, the agent's base model.
- Instructions are added to the system prompt: the agent's instructions when an agent is chosen, and the "User Overall Preferences" block built from Settings › Instructions for that session's harness, model and project type.
- Tools are turned on: Active items, anything the chat selects, and, for an agent, the agent's plugins on top. Available items wait for a slash command, and Disabled items stay off.
The instructions block is fixed when the session is created. A chat that is already running keeps that block, and so does a session the app resumes. To try changed instructions, start a new chat. Tool availability can change from the next chat or turn, as described above. Switching a chat to another provider clears its saved instructions block, so the next session there picks up the current text.
Where each preference belongs
Because the layers stack, most preferences have one natural home:
- True for nearly every chat, such as commit message style: Overall instructions in Settings › Instructions.
- True for one harness, model or project type, such as a note that applies only to Codex chats: a scoped instruction with Append. Use Replace only when that scope needs entirely different instructions, and keep it near the top of the list.
- True for one project's code: the project's own Instructions page, where the project has one.
- A repeatable kind of task with its own model, instructions and tools: an agent, picked from the model picker when that task comes up. Share it when others do the same task.
- A tool most chats use: Active.
- A tool needed now and then: Available, called with a slash when needed.
- A tool to keep but not use for now, or one that overlaps another: Disabled.
When a chat isn't behaving as expected, the same order works for checking: which model or agent it started with, which instructions applied when it was created, which tools were Active or selected, and, for a failing MCP tool, what Test connection reports.
Where it stops
- Instructions apply when a new session starts. Running and resumed chats keep their saved instructions block; tool availability can change from the next chat or turn.
- The Harness choices for scoped instructions are Claude, Codex and Ollama.
- Agent instructions are limited to 64 KiB, and agents with collections, local-only plugins, MCP servers or MCP sign-in preferences can't be shared.
- Available doesn't stop Claude Code from loading plugins enabled in Claude Code itself; use Disabled for those.
- Skill updates work only for skills installed from GitHub, without version numbers or changelogs.
- MCP health badges show the last recorded check, not live status.
Try it
Instructions, Agents and the Customize statuses, skill updates and MCP health checks are in the current Unstoppable desktop app, version 1.21.0. Download it, open Settings › Instructions for text every chat should start with, and open Customize for agents and installed items. If skills or MCP are new to you, Aaron's explainers What Is an AI Agent Skill, and How Does It Help? and What Is an MCP and Why Do Coding Agents Need It? cover the basics.