
Most people who try an agentic integrated development environment (IDE) already have an artificial intelligence (AI) coding setup. They pay for a Claude or ChatGPT plan, perhaps a GitHub Copilot seat, and they have a set of repositories they have worked in with Claude Code or Codex. The Unstoppable desktop app is built to run on that setup rather than replace it: your projects come in from your existing history, your chats run on the accounts you already pay for, and you decide which model handles each piece of work.
Four features cover that path, from a new install to a chat running on the right model:
- Let's get started, the first page of a new install, which imports the projects in your Claude Code and Codex history.
- Provider accounts, including GitHub Copilot, so Claude, Codex and Copilot models run under your own plans.
- Auto, a model picker choice that picks a model for each message.
- The Codex context window, a per-chat choice of how much a Codex chat keeps in view.
This post explains how they fit together and where each one stops. Each section links to the original post for the detail.
Three choices, at three levels
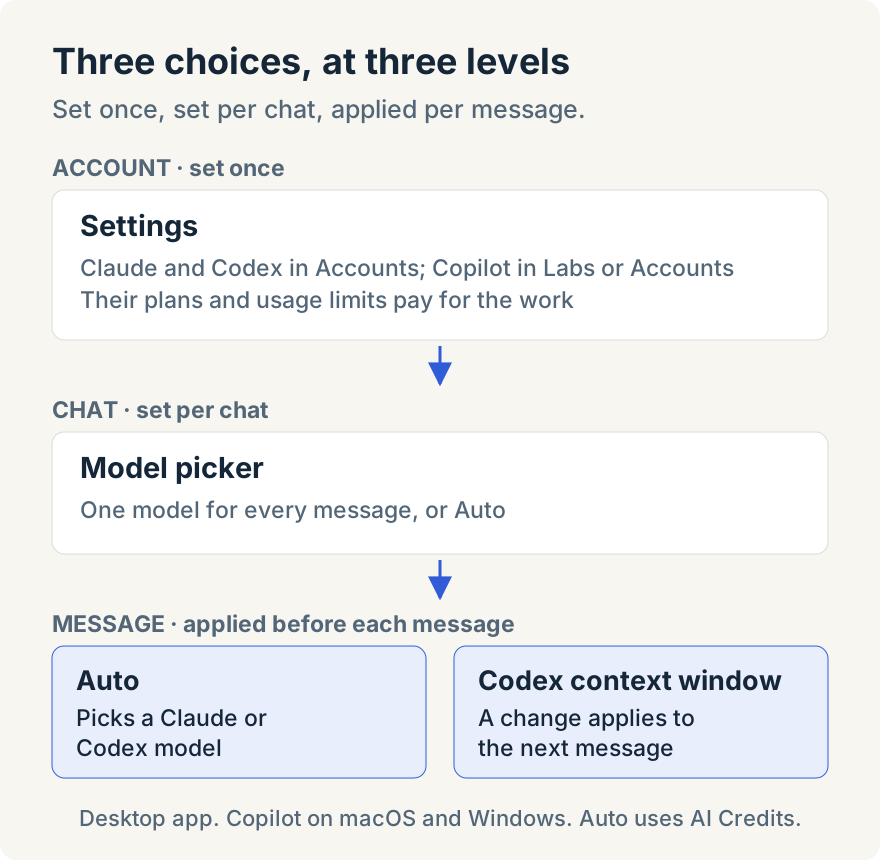
Running agents on your own plans comes down to three questions, and each is answered in a different place:
- Which account pays for the work? You answer this once, in Settings, by signing in to Claude or Codex and connecting Copilot.
- Which model answers? You answer this per chat in the model picker, or hand it to Auto, which answers it again before every message.
- How much does the chat keep in view? For Codex, a default in Settings › Codex covers new chats, and each chat can change it for its next message.
The rest of this post follows that order, starting before the first chat.
Start from the projects you already have
If you have used Claude Code or Codex on a computer, your work is already there: the folders you worked in and the accounts and skills you set up. Since version 1.12.0, a new install of the Unstoppable desktop app opens on a page called Let's get started instead of an empty app. Michael Williams built the page and removed the old onboarding wizard and tour it replaced. It builds on the Claude and Codex project import Ryan Le built earlier.
The page shows two things:
- Your Claude and Codex accounts. Each row shows the signed-in email and plan, or a Connect button. A line under it confirms that what you added to Claude Code or Codex, such as skills and plugins, is ready in those chats. It is read from your existing setup, not copied.
- The projects on this computer. The app reads your Claude Code, Claude Desktop and Codex history for the folders you worked in. Projects used in the last 90 days start checked; older ones sit behind Show N older projects.
Select Import N projects and the checked folders become projects. A folder with a Git repository becomes a Code project, and any other folder becomes a Cowork project. As the page puts it: "Source folders stay where they are, and nothing runs until you start it." You land on Home with New Task pointed at your most recently used project. Skip for now goes to Home without importing.
The page imports projects, not chats. Chats from a Code project open in a new worktree, so commit and push first: uncommitted or unpushed changes stay in the original folder. When you want chats, open Settings › General and use Import projects.
The page appears only on new installs, only in the desktop app, and only for local history: Claude.ai Projects in the cloud have no local folder, so they are not listed. The full walkthrough is in How to bring your Claude Code and Codex projects into Unstoppable.
Connect the accounts that pay for the work
Claude and Codex sign-ins live in Settings › Accounts, in the large language model (LLM) provider section, labeled LLM provider, where each provider has its own row. A chat that runs on one of those sign-ins runs under that provider's plan and its usage limits.
GitHub Copilot joins them as a third provider. Ryan Le built the integration, which arrived in version 1.8.0 and runs Copilot through Copilot's own runtime:
- Open Settings. The GitHub Copilot section is in Labs (named Experiments before version 1.12.0). Once Copilot moves out of Labs, its sign-in is a provider row in Accounts beside Claude and Codex instead.
- Select Connect Copilot. The app downloads the Copilot runtime first and shows its progress.
- Sign in to GitHub. In current versions the section shows a code to enter on GitHub, with Copy code and Open GitHub.
- When it reads Copilot connected and "Signed in as" your GitHub username, Copilot models are ready.
Change account signs out before connecting a different account, and Disconnect Copilot stops any Copilot tasks that are running.
Once connected, the model picker gets a Copilot tab with the models your Copilot account offers. Copilot models work in chats, in workflow steps that name a Copilot model, in delegated tasks, and through Remote Control. Usage comes from your Copilot account: the app shows what the account reports, in tokens, and does not estimate a cost for Copilot turns.
Three limits apply. The section says plainly: "Your Copilot plan and usage limits apply." Copilot is available on macOS and Windows only. And if your organization requires every model to go through its own model gateway, Copilot is not offered. More in Use your GitHub Copilot account in Unstoppable.
Choose a model for each chat
With accounts connected, the model picker in the composer is where a chat gets its model. Favorites shows models you starred, All models lists everything you can use, and the tabs after them show each provider's models. At the end of All models, Bring your subscription has a row for each subscription you have not connected yet.
Picking one model is the simplest choice: every message in the chat goes to it, which suits work where you already know which model you want. Choose a model and effort level covers the picker in detail, and Set default models covers the models new chats start on.
Let Auto pick the model for each message
Not every message in a chat needs the same model. A routine edit can go to a fast model, while a hard debugging question may be worth a more capable one. Auto, which Aaron Quirk built for version 1.8.0, makes that choice per message.
Auto is the first row in the model picker, in a chat's composer and on Home: "Picks the best model for you". Select it and send messages as usual. Before each message, model routing picks one of the models the chat can already run. While it decides, the turn reads "Choosing a model…", and when the answer arrives a pill in the turn's footer names the model that wrote it, with the tooltip "Picked by model routing". The pills stay after the app restarts, so the chat keeps a record of which model handled each message. To go back, pick any specific model.
Auto chooses only among Claude and Codex models, and only ones the chat can run:
- On your own Claude or Codex sign-in, it picks among the models of the providers you are signed in to. When Codex reports the models your account offers, choices are limited to that list.
- On AI Credits, it picks among the models offered on AI Credits.
- A new chat can start on either Claude or Codex. Once a chat has started, Auto stays with that chat's provider, so the conversation keeps its context.
Auto also avoids discarding a warm prompt cache. If the current model answered in the last five minutes, routing keeps it rather than switching to a cheaper model when re-reading the conversation would cost more than the switch saves. A switch to a model with a higher input rate is never held back. If routing is unavailable or times out, the chat falls back to the current model if it is still eligible, otherwise another eligible model.
Auto has firm limits today:
- AI Credits. Each routing decision is charged to Unstoppable AI Credits, even when the chat runs on your own Claude or Codex sign-in. Without AI Credits, the Auto row points you to where you can get them instead of turning Auto on.
- Two or more models. If fewer than two models can run in the chat, the row reads "Needs two or more models".
- Chats only. Pipeline steps, hooks, automations and a custom agent's base model still use a fixed model.
- What routing reads. To choose, model routing receives the start of your message (up to 8,000 characters), up to 12 recent messages within 12,000 characters, and the names and descriptions of the candidate models.
For a full walkthrough, see Let Auto pick the model for each message.
Decide how much a Codex chat keeps in view
The model is one choice; how much of the conversation and code that model can hold is another. A larger context window lets a Codex chat keep more in view before it has to summarize, but it also costs more. Tommy Irish built the setting and the per-chat control, which arrived in version 1.20.0.
For new chats, open Settings › Codex. The Context window section has a Default context window with three choices:
- Model default: each model's own window, which varies by model.
- Up to 272k: the largest window at standard pricing.
- Maximum: the largest window each model allows.
The section states the trade: above 272k tokens, each request costs 2× for input and 1.5× for output, and on a ChatGPT plan those requests use your limits faster. That note describes how the provider charges or counts long requests; it is not a bill, and because how much more of a ChatGPT plan a long request uses is not published, the app shows no figure for it.
For one chat, open the usage indicator in the composer. Its popover has a Context window control with the model's preset sizes and Custom, where you type a size in thousands of tokens. A note shows how much of the window is usable, since Codex keeps the rest for its output. A change applies to your next message. If you shrink the window to a size the chat already fills or nearly fills (90% or more), the app asks Compact this chat first?: earlier messages are summarized before your next message. Choose Reduce window to go ahead or Cancel to keep the current size.
The choice exists only for models whose largest window is bigger than their default; for others the popover shows a fixed size. It covers chats only: delegated agents and pipeline steps use each model's default. The web view of a paired desktop shows the usage popover without the control. More in Choose the context window for your Codex chats.
Where each choice applies
Each choice reaches a different part of the app. This table summarizes where each choice lives:
| Choice | Applies to | Does not apply to |
|---|---|---|
| A Copilot model | Chats, pipeline steps that name one, delegated tasks and Remote Control | Computers other than macOS and Windows, and organizations that require their own model gateway |
| Auto | Chats, from the chat and Home composers | Pipeline steps, hooks, automations and a custom agent's base model |
| Codex context window | Codex chats, as a default and per chat | Delegated agents, pipeline steps and models with a fixed window |
All four features are in the desktop app. The web app cannot read the Claude and Codex history on your computer, and it shows the Codex usage popover without the context window control.
How the pieces work together
Taken together, the features describe one way of working. A new install picks up the projects already on your computer, so the first task can start in a familiar repository. Your Claude, Codex and Copilot sign-ins decide whose plan pays for each chat, and the account rows show which ones are connected. In each chat you either fix the model, which keeps behavior predictable, or choose Auto, which can move routine messages and harder ones to different models within the chat's provider, at the cost of AI Credits for each decision. For Codex chats, the context window sets how much history stays in view before the chat has to summarize, with the higher long-context rate stated next to the choice.
None of these choices is final. The picker returns a chat from Auto to a fixed model at any time, the Codex default in Settings changes what new chats start with, and the Copilot section can change or disconnect its account.
Try it
GitHub Copilot and Auto arrived in version 1.8.0 of the Unstoppable desktop app, Let's get started in version 1.12.0, and the Codex context window in version 1.20.0. Download the app, import your projects on the first page, connect your accounts in Settings, and choose a model in the composer.